Thursday, May 30, 2024

May 30, 2024 Gardening Journal

It's been just over a month since I posted about Trash Trailer Man's pigs tearing up my yard.  How time flies.

In that month, we've had a few rainy days.  Only twice were the rains were over 1" but I hope the cumulative total was enough to help rehydrate the ground after what I believe was a very dry winter.

In looking back on my post from April 9, "Do I even still have a garden?", I sounded pretty pitiful and sorry for myself.  I often find it hard to have a positive outlook on things, even when I want to see the best.  But I'm going to try my best to think back on some of the progress that happened in the garden in April and May.

Sunday, April 21 

Gambling that we'd had our last frost of the spring, I decided to go ahead and plant some okra and cantaloupes.  

I planted two rows of okra, one on either side of this 4' bed, then planted three hills of cantaloupe in the center.


The first planting didn't come up, so I tried again a week later, this time planting the seeds thick in the rows.  By the first of May it was coming up, and here's how it looked on Saturday, May 4.  I think it's possible that in some spots, every seed came up!


And here's how it looked as of May 26 (yellow wood sorrel and all!).  I'm afraid the cantaloupes are outgrowing the okra...some of them are already trying to climb up on the okra and it's not really big enough to support them yet.  But maybe it will be ok.


Saturday, April 27

I started the morning by planting three rows of Golden Bantam corn behind the cellar where last year I had a cover crop of buckwheat followed by sun hemp.


The seed was some I had saved from the corn I grew last summer.  I hope, hope, hope that it didn't get cross pollinated by some other variety of corn and grows true to type!

In less than a week, the corn was coming up.  Here's how it looked on Saturday, May 4.


And here's how the corn looked as of May 27.  I've thinned it once, but it may need to be thinned a bit more, especially since it's putting out lots of side shoots. 


After that, I decided a row of the cover crops had to go.  I knew the rye wasn't quite mature enough - it hadn't made it to milk stage - but the San Marzano tomatoes needed to be put in the ground ASAP or they were going to die (again, I started my tomatoes too early).

So I put on my gardening gloves, grabbed the new sickle I bought on Amazon, and got to work on the Hügelkulture row.

The sickle worked GREAT.  It cut through the tough rye stalks with very little effort, and was so much easier on my hands than using the grass trimmers, which is how I cut the rye last year.  I wish I had bought one years ago!

Because it cut so well, I was able to just crawl on my knees down the row, laying the rye over in place.  In 20 minutes, I had already made it about 1/3 of the way down the row.


I had started at 11:14 am, and by 12:17 pm, that row was finished.


And while crawling down the row cutting it by hand was a bit hard on my knees, and I maybe could have cut it with my string trimmer instead,  I really think it would have been much harder to cut with the trimmer.  And, I likely would have killed this little toad.  


Of course I could have killed it with the sickle too, but the odds of that happening were much less because it was literally "hands on" cutting.

Sunday, April 28

I had hoped that after I terminated the winter rye, I could let it dry for about a week before I planted anything into it.  But the San Marzano tomatoes were looking so bad, I decided the sooner they were put in the ground the better.


The tomatoes actually look better in this picture than they did in real life.  The leaves were all starting to turn very yellow and many of them were already blooming because they thought they were dying.

I had potted the plants on into bigger containers when they outgrew the smaller pots.  Turned out that while it did let me postpone planting them out a while longer, the creamer and juice containers I used were not a good choice for pots!


The tomatoes were badly pot-bound and because the containers had ridges on the inside that went around the container, I couldn't get the plants out!  I ended up having to cut them out with the utility knife!  Lesson learned...don't pot things in a container that has horizontal groves or ridges inside!

I had planned to lay them on their side so they'd root along the stem, but the stems were already so thick I was afraid they'd snap if I did that.  So I just dug the hole as deep as I could and plopped them in.

The plants seemed awfully spindly so I stuck a stick beside each one and used a stem of the winter rye to tie the plants to the stick.


I also hoped that would protect the stems from cutworms, because I didn't dig around to clear the area of cutworms as I planted.  

By May 4, the tomato plants were starting to recover from their over-long stay in the containers.


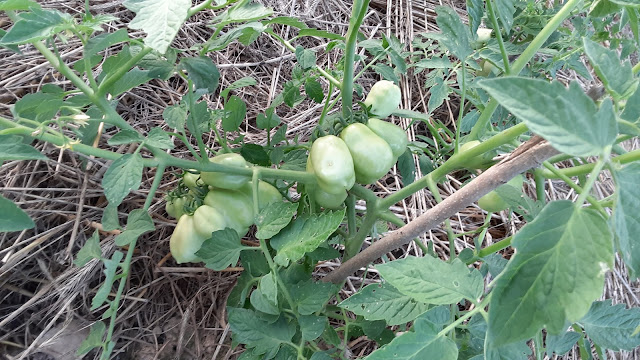
And here's how the tomatoes were looking on May 26.  Almost every single plant is loaded with big clusters of tomatoes, with the exception of the first one in the row.  It's a beautiful plant, but for some odd reason it doesn't have a single tomato on it...maybe not even a single bloom.  


I also "earthed up" the Russet potatoes with manure/straw that I had saved back just for that purpose.  Russets are an indeterminate potato (who knew there was such a thing!) so it is recommended that they be earthed up. The Kennebec potato is a determinate type, so earthing up is optional.  I decided not to do anything with them.


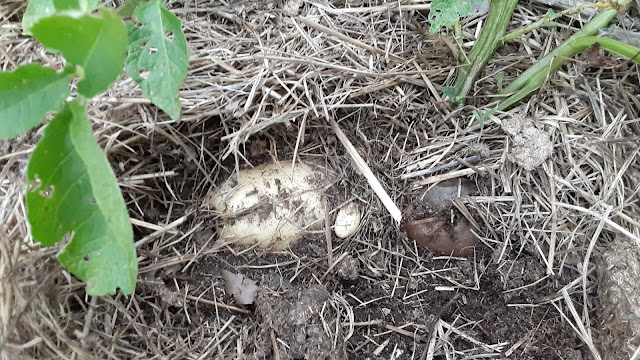
And here's what I'm found under one of the Kennebec potato plants this afternoon.  I didn't measure, but I'm estimating that potato is about 2 1/2" long, so  nice size. 


Saturday, May 4

I planted a few more things....

1) African runner peanuts


And here's how the peanuts looked as of May 26.


2) A summer cover crop/home-grown mulch of Sorghum Sudan Grass.


Here's how the Sorghum Sudan grass looked as of May 26.


3) Some Lilliput Zinnias from seed I saved.


And the Zinnias as of May 26.


I also started terminating more cover crops.   I cut down all of the crimson clover except a small section of one row that was just now reaching full bloom.  That piece of the row wasn't covered with wire over the winter, and the rabbits sure enjoyed it (which meant it was a bit later putting on growth).


I also got started on the big patch of winter rye out by the raspberry plants.  After I cut the first block, I set out three new raspberry plants, and threw down some purple hull peas into the cut rye as a summer cover crop.


Here's how the purple hull peas looked as of May 26.


Friday, May 10

I finished terminating the last two rows of winter rye.  These rows also had hairy vetch planted in them, and they were much harder to terminate than the winter rye alone.


But my, oh my, oh my...as I was cutting, I was absolutely amazed by the amount of biomass that those two rows made.  Both rows are now covered with a layer of mulch about 6" deep.  I'll be interested to see what it looks like come time to plant my winter cover crops.

Wednesday, May 15

Even though the jalapeno transplants weren't very big, I decided to just go ahead and get them out in the garden.


Because the aluminum foil trick worked for the broccoli, I did the same thing with the peppers.


The Cherokee Purple tomatoes were starting to get pretty big, and would soon be in danger of falling over.  So I put up a couple of t-posts and some sticks to make a support to tie them to.


And here's how the tomatoes looked as of May 26.


There are several nice clusters of tomatoes too!


I did mess up though (I think) when I cut some Johnsongrass from the mud hole area to use as mulch around them.  About a week later, I noticed the tips of some of the tomato branches were wilted, and on a closer look, there were holes in the side of the stems, some with frass deposited on the stem.


While I didn't find the culprit, I suspect it was a stalk borer of some type, possibly brought into the garden in the Johnsongrass.  From what I read the females lay their eggs on grasses in the fall.  They hatch out in the spring and bore into the stems of the grasses, but if something happens to the grass, they can migrate to a new plant, which in this case was probably my tomatoes.  Next time I'll know better...lay the cut grass out to dry before I put it on the garden!

But thankfully there doesn't seem to be too much damage, so I hope we'll still get some nice tomatoes by late June or early July!

Sunday, May 26

I finally got some Kentucky Wonder beans to come up on my second try.


And I finally got some yellow squash to come up and grow.  The largest plant had one female bloom on it, but no male blooms to be found.  Luckily the pitiful little plants that I had started in toilet paper tubes had a single male flower open up the next day, so I tried hand pollinating the flower on it's second day.  I hope it wasn't too late.


The patch of Bulls Blood beets are starting to make little beets now.  I never did get any beets to grow last year despite repeated attempts.  Not sure what was going on with them, but I wondered if they were being eaten by slugs or crickets.  Something had actually started in on these when they were smaller, but most of them have survived.  

Beets aren't something I'm a big fan of (to me they taste like dirt - or as I imagine dirt would taste if I ate it!).  But RAF likes the ones my mama makes - pickled beets - so I hope I can make him at least one jar this year using her recipe. 


There are also several nice Marketmore 70 cucumber plants, and they're starting to bloom.  Just like with the beets, I couldn't grow a cucumber to save my life last year, and while that didn't bother me too much (because I don't really care for raw cucumbers either), RAF and youngest daughter really love them, so I hope we can make some for them this year.


The raspberries are starting to ripen, and if I can beat the birds to them, there will be enough for a few nice little snacks.  I actually had a handful today...yummy!


The blackberries are turning slightly red, and the four older plants are absolutely LOADED with fruit. RAF doesn't care for the raspberries (he said, "You can have all of them.") but he's a big fan of these  blackberries.  So I know he's looking forward to having these!  I hope we'll start picking some by mid-June.


The little Gala apple tree was covered with blooms this year, and because there were only about four flower clusters on the Enterprise apple, I didn't figure any of those blooms would be pollinated.  

But boy were they pollinated!  I think almost every single bloom set a small apple! 

For a while, I was afraid I was going to have to do some serious thinning!  But Mother Nature took care of that herself, leaving about seven nice little apples on the tree.  I hope they go ahead and ripen because I really do like Gala apples!


After a very rough start, a few of the onions did manage to survive, and have made nice little bulbs, some of them about 2" in diameter.  I am wondering if they're ready to pull, or if something has just bent the tops over.


The Florence Fennel is looking like it might actually live.  If it can bulb up before the weather gets too hot and it bolts, I'm excited to give it a try.


The second planting of carrots...


The third attempt at celery, although the plants are still very tiny and may not make it...


The Globe Artichokes...


I think that will do for this post.  There are a few other things: snow peas (which are almost finished); early frosty peas (which have produced a few pods); Swiss chard (which I don't know what to do with); red sails lettuce (which is starting to bolt); Boston pickling cucumbers; a variety of slicing and cherry tomatoes; parsnips; and sunflowers galore!  

And while I was kind of in a down-in-the-dumps mood when I started writing this post, just looking at the pictures has cheered me up a bit.  

It will be interesting to see what comes out of the garden in June, and how much things change!


Saturday, April 27, 2024

So much for no-till......

Well....not really.  But that's kind of how I felt when Mo and I walked into the back yard a couple of days ago and discovered this:


At some point between our morning walk around the yard and the one in the afternoon, Trash Trailer Man's pigs had been back.  Some of the trenches they dug were 6" deep!

Pigs apparently have a good memory.


Piglets eating pecans last fall.

Luckily, they weren't interested in the garden.  

But it's painfully obvious that Trash Trailer Man has no intention of building a fence to keep his animals in.  So that means that I just need to get my fence finished.  

"Good fences make good neighbors," I always heard.  I don't think there's any fence in the world that can make him a good neighbor.


Monday, April 15, 2024

WHY THEY DO THIS?

I had to laugh after my youngest daughter sent me a picture of her car with this commentary:


how and why does my car keep getting bird bombed like this UNDER THE CARPORT

WHY THEY DO THIS

Why laugh?  Because I've been struggling to understand something that's happened in the garden that has me feeling exactly the same way.

So here's what happened.

Earlier this spring, I had a bunch of nice little broccoli and cabbage transplants started.  I set them out in the 4' x 8' raised bed, being careful to put one or two little metal sticks beside each plant to protect them from cutworms.  I covered the bed with insect netting to protect it from the cabbage moths and cabbage white butterflies.  All should be good, yes?

Not exactly.

Brassica seedling after a nighttime cutworm attack.

When I checked the bed a day or two later, every plant - every - single - plant - was dead, decapitated by cutworms! 

I'm not sure why the metal stick trick didn't work unless it was because the plants were set out into compost that was very loose, and that allowed the sticks to move so that the cutworms could wedge themselves between the stick and the stem. 

I was so ticked off!

I had a few more plants that I had held back, and I decided I'd go ahead and grow them on in pots for a bit longer.  Those first ones were pretty small, after all.

One evening last week, I took the two biggest and nicest broccoli plants and put them in that same bed.  Again, sticks beside them, being very careful to get the sticks as close to the stems as possible.

The very next morning:

Poor little decapitated broccoli plant.  When I dug around the base, I found the culprit and relocated it to the platform bird feeder.  I hope a bird had a good meal out of it.

I was furious!  Why????  What did they gain by just cutting the top off the plant?  It's not like the plant  can keep growing and feed them for longer...it will die.  

I actually asked The Google, "Why do cutworms cut?" No one had an answer for that.  There were lots of articles saying things like, "They're called cutworms because they cut the stems of young seedlings."  Well, DUH.  But WHY?  What do they have to gain from that destructive and seemingly senseless behavior?

I still don't know.

But in an attempt to have some broccoli this year, I've resorted to a somewhat drastic approach.  Sticks by themselves?  Out.  Aluminum foil, or sticks with aluminum foil?  In.  Definitely worth a try anyway...anything to protect the little stems.

So the last of the broccoli plants have been put out in that same raised bed and wrapped in foil.

Wrapped in a blanket of aluminum foil.

After doing a bit of reading about cutworms, I think one of the reasons they may be worse this year is because I've switched to no-till.  Apparently, tilling is one method of controlling them. 

Tilling the garden in early spring and fall can help kill cutworms or pupae or expose them to the weather and to predators such as birds.

https://www.pesticide.org/cutworms#:~:text=Controlling%20weeds%2C%20grasses%20and%20plant,to%20predators%20such%20as%20birds.   Accessed 4/15/2024.

So as I work in the garden from now on, I'll be on the lookout for them any time I do any planting.  After I set out the new broccoli plants, in one little 2' section of a row that was about 1' wide - a spot where I intended to plant carrots - I found eight of those rascals! 

Cutworms from the carrot bed.

I kindly relocated them to the bird feeder (most probably escaped over the edge into the front flower bed).

So while I had thought I'd call this post, "Why do cutworms cut,"  I have decided that I like her question better.  

WHY THEY DO THIS?  


Tuesday, April 9, 2024

Do I even still have a garden?

When I decided to go "no till" back in September 2021, I knew there were parts of the garden where the soil (dirt) just really wasn't very good.  It is a clay/silt soil with low organic content, and even worse, parts of the garden were heavily compacted when I had our cellar installed and had some tree-trimming done back in spring of 2020.  

Ideally, I could have just put a good layer of compost on my rows, and let the earthworms do the work of incorporating that into the dirt.  But I don't have enough compost to do that.  I decided my next best bet would be to try cover crops.

I didn't have very good luck with my cover crops last summer (the only exception was the buckwheat and sun hemp, which both grew very well!).  I got my cover crops planted too late, and they had just sprouted and started to grow when the dry weather hit.  They didn't make it.  I ended up covering parts of the garden with a billboard tarp just to keep the grass from taking over.

By late summer I had decided to rebuild my raised rows so they were wider and flatter.  As I worked on that project, I also planted my fall cover crops.

  • I used daikon radish in three of the new raised rows, and as I finished relocating the dirt to build out the rows, I added winter rye and hairy vetch.  In a fourth row, I planted some oats from seed I saved last summer, along with some fava beans seed I had saved last spring.

  • I planted lentils from a bag bought at the grocery store on the Hügelkulture bed, then went back later and added some winter rye and hairy vetch to the edges.

  • I planted daikon radish and crimson clover in the east rows of the garden.

Happily, the cover crops have all done very well this year.  The daikon radish and lentils grew well into the winter, but were finally killed by the repeated cold weather.  The winter rye, the vetch and the crimson clover didn't put on much above-ground growth during the winter but apparently the roots were busy growing, because when temperatures warmed just a bit, the above-ground parts took off growing like gang-busters!  Once the winter rye hits "milk stage" and the crimson clover is nearing the end of its bloom, I'll cut everything off close to the ground and leave it on the rows as mulch.


My wild cover-cropped jungle garden on April 9, 2024.  Yes, there are rows there....

But despite the fact that the my garden is the way it is right now because that's how I decided it should be, no matter where I look in the garden, I almost feel overwhelmed and frantic.

You see, not only have several of the rows been overgrown by my cover crops, I intentionally left the winter weeds as food for the early pollinators.  They were very pretty in full bloom, but now that they're past their prime I have to try really hard to resist the urge to pull them all up.  

Winter weeds, primarily Red Deadnettle and Henbit Deadnettle carpeting the garden behind the cellar.

My Brussel's Sprouts stayed alive all winter, but never made a single sprout.  But when I saw that they were going to bloom, I left them too.  More food for the early pollinators.

Yellow flowers in the foreground are Brussel's Sprouts while the one plant a couple of rows over is the only purple-top turnip that survived the rabbits.

The rabbits nibbled on the crimson clover all winter, but once we had a few warmer days, it started to grow so fast that I guess even they couldn't keep up.  I noticed the first flowers a couple of days ago.

Two rows of crimson clover, just now starting to bloom.


And the back part of the garden by the berry plants is such poor dirt that I am not even going try to grow anything there for a while yet.  I just planted it as one big winter rye patch and plan to follow that up with mix of purple hull peas, sunflowers and zinnias.


Large patch of winter rye, with some volunteer hairy vetch mixed in.


I'm not a "neat and orderly person" - I'm actually the opposite of that.  "Messy and disorganized" is me on my best days.  

But traditional gardening - the gardening method I grew up with - dictates that a garden is supposed to have neat and orderly rows of plants with clear walkways between them.  What has really surprised me this spring is that the "messy and disorganized" state of my garden has bothered me more than I ever thought it would.

I keep having to remind myself of the purpose for the cover crops, and the long term goal.  "Remember why you planted them," I keep telling myself.  "They're almost finished and will be gone soon - just be patient."

And on the recent warm afternoons, a walk through the winter weeds and the cover crops underscores for me just why "messy and disorganized" is the right choice for my garden at this moment in time.

It is still a garden I reckon.  It's just not yet ready to have order imposed on it.


Monday, April 8, 2024

Eclipse


Total solar eclipse at about 1:52 pm on Monday, April 8, 2024.

Sunday, April 7, 2024

If you plant it, they will come

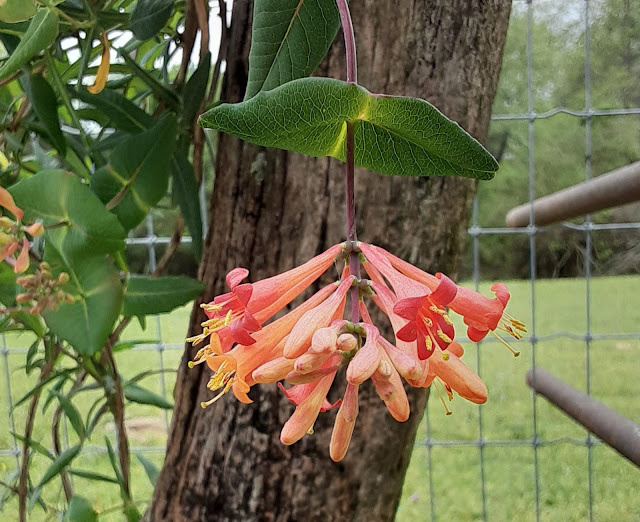
The Coral Honeysuckle (Lonicera sempervirens) vine that I started from a cutting taken down by the creek not only survived, it looks like it thrived and is putting on a spectacular show this spring.


It is absolutely covered in clusters of orange-red blooms.

My little sister told me the other day that she saw her first hummingbird of the year.  I wondered if they'd find the honeysuckle, and if they did, would they nectar on the flowers.  I was afraid maybe the flowers were too close to the ground, and a hummingbird might feel unsafe there.

But today as I wandered aimlessly around the back yard, looking at the plants there for the thousandth time, a hummingbird had found the vine and was moving from one flower cluster to the next.


Ruby-throated hummingbird, nectaring on the Coral Honeysuckle.

If you plant it, they will come.  It's how things are supposed to be.


Friday, March 29, 2024

Planting the Ozark Chinquapin

Today, the first little Ozark Chinquapin that sprouted was moved to its new home.

1) Dug a hole with the post hole digger - the hole was slightly deeper than the cardboard tube was tall.


2)  Drove a T-post on either side of the hole, spaced so that the wire cage would fit between them.

3) Put some topsoil down in the bottom and mixed it with some of the clay that came out of the hole.  

4) Wrapped the cardboard tube in chicken wire.  This is an attempt to protect the little nut, because if it is stolen, the tree likely won't survive.  The chicken wire will rust and eventually break (I hope).  If it doesn't, I can dig down around the tree when its older and cut it loose.

5) Centered the cardboard tube in the hole and started filling it back with topsoil mixed with the clay.


6) Filled the hole to the top then slightly pinched the wire around the top, again, trying to protect the nut.


7) Put a plastic container around the little tree to protect it from the wind (it was VERY windy today!).  The container will also help concentrate the water around the tree's roots this summer.  I learned that last year when I had that same container around a little oak tree that I planted.  Mounded the rest of the clay around the plastic container, because I believe the dirt will settle when it rains.  I may actually have to remove the cage after it rains and fill in some more around the cardboard tube.


8) Secured the wire cage around the newly planted tree.  The cage may look like overkill, but because the cattle are still in that field, it has to be sturdy enough to withstand them rubbing on it.  I may actually drag some of the cut privet limbs up and pile them around the cage to keep the cattle back until we get the new fence put up (this is my future wildflower meadow).


9) Stepped back and imagined how the two Ozark Chinquapin trees will look five years from now.  The tree I planted last year is in the cage by the stump, with the newly planted tree about 10 feet to the west.  I hope I planted them far enough apart.


I really hope the little trees put on some good growth this year.  I was a bit disappointed that the one I planted last year because it is only about 3" tall.  But it has new leaves, so at least I know it survived the winter.  I'll see how the trees look come June.

UPDATE 4/3/2024 - I looked out the front window yesterday morning and there was Arnold (the young bull) beside the new cage, just rubbing and rubbing and rubbing!  "This feels so good!" I heard him thinking.  Luckily, the cage and posts did their job and stayed in place.  He did bend the wire in a couple of spots but not so bad that the cage is non-functional.  

UPDATE 4/7/2024 - Well, the cows were at it again, rubbing on the cage and it is now bent in quite a bit at the bottom.  I drove two more T-posts beside it...one on the east side and another on the west.  I'll see what they do now.  The good news is that the tree still looks Ok.


The Ozarks Chinquapin Foundation 

(Other blog posts about the Ozarks Chinquapin)


Tuesday, March 19, 2024

Spring 2024


Sunrise at 7:27 am on Tuesday, March 19, 2024.

Thursday, March 7, 2024

All stove-up


Merriam-Webster definition of "stove up."


I've been trying to make up for lost time with the privet down in The Carey Woods.  I got a late start this winter and because of the unseasonably warm weather in February, I knew the sap was going to start rising, putting an end to the cut-stump treatments.

I feel that I made really good progress though. The section I started on last winter is almost entirely clear now with the exception of just a few trunks.

I wish I had kept count of how many trunks I cut and treated.  I do know that in the area between the downed trees shown in the top picture below, I cut and treated 25 trunks in a 15' section.  There was lots and lots and lots of privet down there...so much privet.

Privet thicket last winter.


Area shown above as it looked after more work this winter.


Looking up the hill through the same area now.  The privet has all been cut and the stumps treated.  With it gone, you can now see all the way up to the top of the hill.

RAF always worries when I go down there, and offers to go with me, but I tell him he doesn't need to go.  He then always tells me to be extra careful.  I always tell him I will be.

It really isn't an easy place to work.  I've slipped on rocks on the hillside, and stumbled climbing over things.  I've had privet limbs flip up and hit me in the lip.  I've had scratches from the stickers and bruises on my ribs from bracing the loppers while I cut.  Nothing serious though.

But a couple of weeks ago as I was tugging a privet limb out of the cedar top, one of its wispy long branches whipped across my face under my glasses.  It happened so fast that I didn't even have time to  blink.  The end of the limb raked right across the surface of my right eye.  I thought I was blinded!  It stung for a good while, but eventually I was able to open that eye and to my relief, my vision didn't seem to be affected at all.

Once my eye stopped watering, I got back to work because I was nearly finished with that section and I didn't want to quit until it was done.  But only a little while later as I was pulling another limb out, it got tangled up with a second limb.  I could tell there was quite a bit of pressure on that second one, which was about an inch and a half in diameter.  The thought had just entered my mind that I needed to stop tugging and untangle them, when suddenly that second limb snapped free and WHAM! hit me right in my left temple.  It knocked me sideways and my glasses went all wonky and almost fell off.  I think if I hadn't been wearing the glasses though it could have been much worse.  As it was, all I got was a big scratch and a really sore spot beside my left eye.  After a little bit of bending and straightening on the glasses, and a few choice words and phrases later, I was able to get back to work, and finish for the day.

Both of those accidents happened, I think, because I was tired and kept working when I should have stopped.  I'm just very lucky that my eyes weren't hurt.  (And yes, I intend to get some good eye protection that I can wear over my glasses before I start cutting again next winter.  Eyeglasses <> eye protection.)

When I got ready to go down to the woods this past Sunday, RAF looked at me and said, "Please be very careful," then frowned.   I told him I would be.

I knew I wasn't going to be able to cut and treat very much.  I was low on herbicide, and the privet had already started to green up.  I cut the last big privet bush at the top of the hill, treated it and just managed to squirt out enough herbicide to get all the way around the stump.

Since the herbicide was gone, I decided to just walk down the hill with Walter and start cutting out the tops of every privet tree I came across.  That didn't last long though...I made it to the bottom of the hill, cut a few limbs and Walter's battery died. I had found a nice privet stick that made a perfect walking stick, so the stick, Walter and I headed back up the hill through the newly cleared path.  

I don't know if I just wasn't paying attention, or if I'm just naturally clumsy (both?) but as I got almost back to the top of the hill, I snagged the toe of my right boot on the butt end of a privet trunk that I had left laying perpendicular with the pathway last year.  My momentum was forward, but because my toe was snagged on the stick, the movement of my foot was not.  I fell and landed HARD on a rock with my right knee.  Serious pain - for a few minutes I wasn't sure if I was going to be able to get up.  I sat there for a while, feeling all around on my kneecap and since nothing seemed to be broken or out of place, I carefully tried bending and straightening my knee.  It still worked.  So I picked up the stick that had tripped me, gave it a few choice words and phrases then threw it with some force onto one of the piles of limbs.  I then picked up Walter (I don't think he was injured in the fall) and my privet walking stick and limped up the hill to the cart and made my way back home.

I didn't tell RAF what had happened.  I just put some antibiotic ointment and a bandage over the cut on my knee and kept working on stuff for the rest of the day.  But when I got up the next morning, I knew the injury was a bit more serious than I had thought and I had to confess to RAF what had happened.  He was not pleased.

By Monday evening, my knee was quite swollen, red and hot to the touch.  I could barely bend it, and once bent, could barely straighten it back out.  I was, as the expression goes, all stove-up.

But it's now Thursday evening, and while my knee is still very sore, I can tell that it's better.  The swelling has gone down some, and it's not so red and hot anymore.  I can actually bend it going up and down the steps.  

I still have one more day before the weekend.  Lord willing, I'll be able to take Walter back down into the woods and continue on my mission.  I really did think I was being careful. So can I work down there without doing something else stupid?  That's the million dollar question isn't it....

More posts about my war on privet


Monday, March 4, 2024

Ozark Chinquapins in 2024

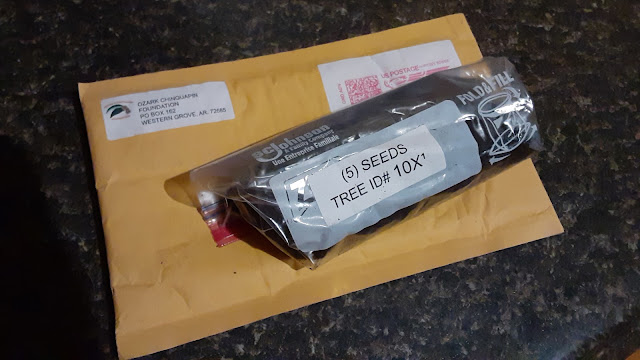
I re-upped my membership in the Ozark Chinquapin Foundation on January 1 this year and on January 27, I got a nice surprise in the mail!

Chinquapin seeds

Unfortunately, while the package says five seeds, there were only three in the bag, and I'm not sure two of those are any good.  One of the three had already started to sprout, but the other two had not.

But even if there is only one viable seed, I hope I can do a better job of protecting it this year, and if the one little tree from last year survived the winter, I hope I can have two here in my yard by the end of the summer.

So today (Monday, March 4) I've taken the two that hadn't started to sprout, and I've planted them in cardboard paper towel tubes.  If they do sprout, my thinking is that I can dig a hole with the post hole digger and just plant them in that hole in their cardboard tube, hopefully protecting the little taproot from being damaged.  I'll be sure to update this post with pictures if (when!) that happens.

UPDATE: Thursday, March 28 - On March 21, I was delighted to discover that a tiny sprout had emerged in one of the tubes!


By this afternoon, the little tree was about an inch and a half tall, with two nice little leaves and a third emerging in the center.


I've tried to mainly water from the bottom once the nut sprouted, thinking that would encourage the tap root to grow straight down toward the water.  So far, there's no sign of the tap root at the bottom of the cardboard tube (and that's a good thing!), but I don't think it will be much longer until it will break through the cardboard at the bottom.  

So tomorrow the little tree will be planted outside and protected with a sturdy cage to protect it from rabbits, deer and (right now, most importantly) the cattle!


The Ozarks Chinquapin Foundation 

(Other blog posts about the Ozarks Chinquapin)