Friday, March 29, 2024

Planting the Ozark Chinquapin

Today, the first little Ozark Chinquapin that sprouted was moved to its new home.

1) Dug a hole with the post hole digger - the hole was slightly deeper than the cardboard tube was tall.


2)  Drove a T-post on either side of the hole, spaced so that the wire cage would fit between them.

3) Put some topsoil down in the bottom and mixed it with some of the clay that came out of the hole.  

4) Wrapped the cardboard tube in chicken wire.  This is an attempt to protect the little nut, because if it is stolen, the tree likely won't survive.  The chicken wire will rust and eventually break (I hope).  If it doesn't, I can dig down around the tree when its older and cut it loose.

5) Centered the cardboard tube in the hole and started filling it back with topsoil mixed with the clay.


6) Filled the hole to the top then slightly pinched the wire around the top, again, trying to protect the nut.


7) Put a plastic container around the little tree to protect it from the wind (it was VERY windy today!).  The container will also help concentrate the water around the tree's roots this summer.  I learned that last year when I had that same container around a little oak tree that I planted.  Mounded the rest of the clay around the plastic container, because I believe the dirt will settle when it rains.  I may actually have to remove the cage after it rains and fill in some more around the cardboard tube.


8) Secured the wire cage around the newly planted tree.  The cage may look like overkill, but because the cattle are still in that field, it has to be sturdy enough to withstand them rubbing on it.  I may actually drag some of the cut privet limbs up and pile them around the cage to keep the cattle back until we get the new fence put up (this is my future wildflower meadow).


9) Stepped back and imagined how the two Ozark Chinquapin trees will look five years from now.  The tree I planted last year is in the cage by the stump, with the newly planted tree about 10 feet to the west.  I hope I planted them far enough apart.


I really hope the little trees put on some good growth this year.  I was a bit disappointed that the one I planted last year because it is only about 3" tall.  But it has new leaves, so at least I know it survived the winter.  I'll see how the trees look come June.

UPDATE 4/3/2024 - I looked out the front window yesterday morning and there was Arnold (the young bull) beside the new cage, just rubbing and rubbing and rubbing!  "This feels so good!" I heard him thinking.  Luckily, the cage and posts did their job and stayed in place.  He did bend the wire in a couple of spots but not so bad that the cage is non-functional.  

UPDATE 4/7/2024 - Well, the cows were at it again, rubbing on the cage and it is now bent in quite a bit at the bottom.  I drove two more T-posts beside it...one on the east side and another on the west.  I'll see what they do now.  The good news is that the tree still looks Ok.


The Ozarks Chinquapin Foundation 

(Other blog posts about the Ozarks Chinquapin)


Tuesday, March 19, 2024

Spring 2024


Sunrise at 7:27 am on Tuesday, March 19, 2024.

Thursday, March 7, 2024

All stove-up


Merriam-Webster definition of "stove up."


I've been trying to make up for lost time with the privet down in The Carey Woods.  I got a late start this winter and because of the unseasonably warm weather in February, I knew the sap was going to start rising, putting an end to the cut-stump treatments.

I feel that I made really good progress though. The section I started on last winter is almost entirely clear now with the exception of just a few trunks.

I wish I had kept count of how many trunks I cut and treated.  I do know that in the area between the downed trees shown in the top picture below, I cut and treated 25 trunks in a 15' section.  There was lots and lots and lots of privet down there...so much privet.

Privet thicket last winter.


Area shown above as it looked after more work this winter.


Looking up the hill through the same area now.  The privet has all been cut and the stumps treated.  With it gone, you can now see all the way up to the top of the hill.

RAF always worries when I go down there, and offers to go with me, but I tell him he doesn't need to go.  He then always tells me to be extra careful.  I always tell him I will be.

It really isn't an easy place to work.  I've slipped on rocks on the hillside, and stumbled climbing over things.  I've had privet limbs flip up and hit me in the lip.  I've had scratches from the stickers and bruises on my ribs from bracing the loppers while I cut.  Nothing serious though.

But a couple of weeks ago as I was tugging a privet limb out of the cedar top, one of its wispy long branches whipped across my face under my glasses.  It happened so fast that I didn't even have time to  blink.  The end of the limb raked right across the surface of my right eye.  I thought I was blinded!  It stung for a good while, but eventually I was able to open that eye and to my relief, my vision didn't seem to be affected at all.

Once my eye stopped watering, I got back to work because I was nearly finished with that section and I didn't want to quit until it was done.  But only a little while later as I was pulling another limb out, it got tangled up with a second limb.  I could tell there was quite a bit of pressure on that second one, which was about an inch and a half in diameter.  The thought had just entered my mind that I needed to stop tugging and untangle them, when suddenly that second limb snapped free and WHAM! hit me right in my left temple.  It knocked me sideways and my glasses went all wonky and almost fell off.  I think if I hadn't been wearing the glasses though it could have been much worse.  As it was, all I got was a big scratch and a really sore spot beside my left eye.  After a little bit of bending and straightening on the glasses, and a few choice words and phrases later, I was able to get back to work, and finish for the day.

Both of those accidents happened, I think, because I was tired and kept working when I should have stopped.  I'm just very lucky that my eyes weren't hurt.  (And yes, I intend to get some good eye protection that I can wear over my glasses before I start cutting again next winter.  Eyeglasses <> eye protection.)

When I got ready to go down to the woods this past Sunday, RAF looked at me and said, "Please be very careful," then frowned.   I told him I would be.

I knew I wasn't going to be able to cut and treat very much.  I was low on herbicide, and the privet had already started to green up.  I cut the last big privet bush at the top of the hill, treated it and just managed to squirt out enough herbicide to get all the way around the stump.

Since the herbicide was gone, I decided to just walk down the hill with Walter and start cutting out the tops of every privet tree I came across.  That didn't last long though...I made it to the bottom of the hill, cut a few limbs and Walter's battery died. I had found a nice privet stick that made a perfect walking stick, so the stick, Walter and I headed back up the hill through the newly cleared path.  

I don't know if I just wasn't paying attention, or if I'm just naturally clumsy (both?) but as I got almost back to the top of the hill, I snagged the toe of my right boot on the butt end of a privet trunk that I had left laying perpendicular with the pathway last year.  My momentum was forward, but because my toe was snagged on the stick, the movement of my foot was not.  I fell and landed HARD on a rock with my right knee.  Serious pain - for a few minutes I wasn't sure if I was going to be able to get up.  I sat there for a while, feeling all around on my kneecap and since nothing seemed to be broken or out of place, I carefully tried bending and straightening my knee.  It still worked.  So I picked up the stick that had tripped me, gave it a few choice words and phrases then threw it with some force onto one of the piles of limbs.  I then picked up Walter (I don't think he was injured in the fall) and my privet walking stick and limped up the hill to the cart and made my way back home.

I didn't tell RAF what had happened.  I just put some antibiotic ointment and a bandage over the cut on my knee and kept working on stuff for the rest of the day.  But when I got up the next morning, I knew the injury was a bit more serious than I had thought and I had to confess to RAF what had happened.  He was not pleased.

By Monday evening, my knee was quite swollen, red and hot to the touch.  I could barely bend it, and once bent, could barely straighten it back out.  I was, as the expression goes, all stove-up.

But it's now Thursday evening, and while my knee is still very sore, I can tell that it's better.  The swelling has gone down some, and it's not so red and hot anymore.  I can actually bend it going up and down the steps.  

I still have one more day before the weekend.  Lord willing, I'll be able to take Walter back down into the woods and continue on my mission.  I really did think I was being careful. So can I work down there without doing something else stupid?  That's the million dollar question isn't it....

More posts about my war on privet


Monday, March 4, 2024

Ozark Chinquapins in 2024

I re-upped my membership in the Ozark Chinquapin Foundation on January 1 this year and on January 27, I got a nice surprise in the mail!

Chinquapin seeds

Unfortunately, while the package says five seeds, there were only three in the bag, and I'm not sure two of those are any good.  One of the three had already started to sprout, but the other two had not.

But even if there is only one viable seed, I hope I can do a better job of protecting it this year, and if the one little tree from last year survived the winter, I hope I can have two here in my yard by the end of the summer.

So today (Monday, March 4) I've taken the two that hadn't started to sprout, and I've planted them in cardboard paper towel tubes.  If they do sprout, my thinking is that I can dig a hole with the post hole digger and just plant them in that hole in their cardboard tube, hopefully protecting the little taproot from being damaged.  I'll be sure to update this post with pictures if (when!) that happens.

UPDATE: Thursday, March 28 - On March 21, I was delighted to discover that a tiny sprout had emerged in one of the tubes!


By this afternoon, the little tree was about an inch and a half tall, with two nice little leaves and a third emerging in the center.


I've tried to mainly water from the bottom once the nut sprouted, thinking that would encourage the tap root to grow straight down toward the water.  So far, there's no sign of the tap root at the bottom of the cardboard tube (and that's a good thing!), but I don't think it will be much longer until it will break through the cardboard at the bottom.  

So tomorrow the little tree will be planted outside and protected with a sturdy cage to protect it from rabbits, deer and (right now, most importantly) the cattle!


The Ozarks Chinquapin Foundation 

(Other blog posts about the Ozarks Chinquapin)


Thursday, February 29, 2024

The Waiting Month

I decided many years ago that February is probably my least favorite month of the year.

I call it "The Waiting Month."

We're teased with signs of spring...daffodils open up and the bluets shine like little purple stars sprinkled through the dead grass.  Sometimes the days are unseasonably warm.  On those warm days, we are tempted to plant some seeds in the garden.  

But we must wait.

February is still winter - late winter, but winter none-the-less.  We will still have frost, maybe even snow.

The sun rises a bit earlier every morning and sets a bit later every evening.  The seasons will change and the earth will wake up from her winter sleep.  She has only to wait a little while longer....


First daffodils of 2024, on February 7.
The first daffodils of 2024 opened on February 7.


Sunday, February 4, 2024

Seeing the sky

It was last winter when I declared war on the privet that has taken over several sections of the woods in The Carey field.  And while I made some progress, I didn't get as far as I had hoped before the warmer temperatures caused the sap to start rising.

I had planned to get back to work this fall as soon as we started getting regular frosts, but one thing and then another got in the way and I only started back to work on the project in December.

But after (I think) five working sessions of about two hours each, I feel like I'm making progress.

Looking northwest toward the gully that runs east of the hay barn.

I started in the gully that runs down the hillside east of the hay barn.  Most of the privet growing there was small, with trunks less than 2" in diameter and it didn't take very long to clear them out.  I also cut and treated several invasive Multiflora Rose (Rosa multiflora) bushes.  The only things left are a few privet trees, rose bushes and some saw greenbrier (Smilax bona-nox) growing across the top edge of the gully.

Earlier in the fall, I had set out some little Carolina Buckthorn (Frangula caroliniana) in the gully thinking they might do well in the dappled shade.  IF the Northern Spicebush (Lindera benzoin) and Flowering Dogwood (Cornus florida) seeds that I collected last fall germinate, I plan to set some of them out in that area as well.  The spicebush should do well in the lower part of the gully where it's more shaded, while I think the dogwood will like the more sunny area near the top of the gully.  I'm still trying to decide where to plant the Pawpaw (Asimina triloba) seeds (if they germinate), and I'm thinking they might also like being down in the lower shaded part of the gully.

(There is a pretty good population of White Snakeroot (Eupatorium rugosum) growing in and around the gully, and I think it might be wise this spring to go through and pull some of the plants up to keep it from spreading too much since it is so highly poisonous.  As for what could go back in its place?  I'm not sure at this point.)

Once the gully was mostly cleared, I moved to the south, back to the area where I stopped work last spring.  I had cut the tops out of lots of the privet trees, but wasn't able to treat them with they glyphosate because they were already starting to green up.   Every single one of them had sprouted back...it was very discouraging to look down into the woods and again see nothing but privet.

All of the privet I topped last spring put up lots of vigorous new growth over the summer.

So much privet....

But the one good thing is that by topping all of those trees, they didn't make berries.  So even though I'm going to quickly run out of time this winter, I now know that just cutting the tops out will knock them back enough that I won't have 10-gazillion privet berries just waiting for the birds to drop them back onto my newly cleared woods!

So Walter, the little Green Shoots foam dispenser, the loppers and I got back to work, and the four of us were able to clear and treat the stumps in that entire section.  

The area between the two large cedar trees is clear!


Yesterday Walter and I started on the privet growing to the north of the cedar trees...the stuff that is left between the trees and the gully.

Because the forecast was calling for rain all weekend, I didn't cut the trees off at ground level and treat them.  For now, I've just cut the tops off and piled them up in the woods.

But what a difference it made!

I can see the mountains to the north!

I know there's still lots of work to do to finish up that section...all of those trunks still have to be cut and treated; I still have a big pile of limbs between the cedar trees that needs to be moved (center left in the picture above); and there are hundreds of privet seedlings that need to be pulled before they have a chance to get any bigger.  But again...what a difference it makes once the privet is gone!!!  

As with the gully, I need to put some thought into what plants can go in to replace the privet.  I've ordered a Ninebark (Physocarpus opulifolius)  and a Black Chokeberry (Aronia melanocarpa) from Food Forest Nursery and if I can get those established here in my yard, I hope to be able to start some more from cuttings and plant those down in the woods.  I've also noticed a couple of Shagbark Hickory (Carya ovata) trees growing along the side of the road in Clarksville and if I can get up the nerve to stop next fall to search for some nuts, I'd love to try to grow some of those trees down there.  The Eastern Redbud (Cercis canadensis) trees I set out last spring didn't make it (so far as I know), so I'm going to try again with them this year.   I'll probably also try putting out some Elderberry (Sambucus canadensis) and Red Mulberry (Morus rubra) just for grins.  Maybe they'll make it.

As for "forbs" I'm still trying to decide what to plant.  I did collect seeds from Evening Primrose (Oenothera biennis) that was growing in the ditch across from Hardees in Clarksville, so I'll probably just toss some of those out in a couple of places.  I might also try to throw some Cup Plant (Silphium perfoliatum) seeds on the ground next winter.  

No matter what I decide to plant down there, the biggest problem I'll have to overcome will be the cattle (and possibly rabbits and deer?).  So while I'd love to keep all of the privet limbs in nice neat piles, I may end up having to create little piles here and there to protect young plants.  I suppose that's Ok though, so long as I can keep the invasive Perilla Mint (Perilla frutescens) and Japanese Honeysuckle (Lonicera japonica) from taking over those piles!

So what's next?

First priority is to cut and poison the privet and multiflora rose across the top of the gully, then cut and poison the privet trunks that I've left standing down by the cedar in the woods.

After that, I'll start on the privet shown on the right side of the last picture above.  That may take up the rest of my time this winter because there's quite a bit of it left.  But I'll do what I can, and then start cutting the tops out of the bigger privet trees when I run out of winter.  That's something I can do even into the summer (preferably before the trees bloom), and anything that keeps the trees from making berries is one more step in the right direction.  While there are thousands of tiny privet seedlings in the areas I've cleared, pulling those is another thing that I can work on during the summer months.

I just wish the pictures could convey how much better it looks in the areas where the privet has been removed.  It's so different from how I described that part of the woods in my January 29, 2023 post:

I find that part of the woods to be very dark and creepy, almost eerie, because the privet is so thick down there.

What a difference it makes to be able to see the sky!


Sunday, December 31, 2023

Farewell to 2023

Sunrise at 7:38 am on Sunday, December 31, 2023.

Thursday, December 21, 2023

Winter 2023


Winter solstice sunrise on December 21, 2023.
Unfortunately, the clouds blocked me from seeing exactly where the sun was and what time it came up,
but you can tell the general area by the brightness in the sky.

Saturday, September 23, 2023

Fall 2023


Sunrise around 7:11 am on Saturday, September 23, 2023.

Monday, September 11, 2023

September 11, 2023 Gardening Journal

When summer got here this year it meant business.

The last week of June was brutal.  We were already behind on rainfall - not for the year, because we had heavy flooding rains in March, but behind by quite a bit for April and May.  And as June came to an end, the temperatures soared to near or just over 100° F for several days in a row.

The sun beat down on the poor plants day after day, intense and unmerciful. And with the lack or rain it didn't take long for them to start showing signs of stress.

I decided last summer that mulch and shade cloth are a gardener's best friends in the summer.  I bought two more shade cloths, but again, I found myself way short on mulch.  

Last year's straw was pretty much gone, decomposed, mostly into the pathways.  I tried to buy a couple of bales of straw at the feed store, but they were sold out and didn't expect more until the wheat harvest got underway.  

I had planted a row of Sorghum Sudan grass with the intention of cutting it several times through the summer, but with no rain, even that wasn't growing, so there wasn't anything to cut.  I finally resorted to cutting some Johnsongrass that was growing in The Mudhole area, just to have something to at least try to cover the bare soil.

It just wasn't enough.  

So the spring garden was pretty much a bust.  We did eventually end up with a few things: snow peas; strawberries; blackberries; cucumbers; green peas; tomatoes; yellow squash; potatoes; green beans; and some cabbage.  But when I say "a few" that really means "a few."  I think we harvested maybe eight yellow squash before the squash bugs killed the plants.  Between about eight cucumber plants, I think we got four cucumbers.  We got enough green beans for two meals.  You get the idea.  

The only exceptions to the "few" might be the San Marzano tomatoes and believe it or not, the Jimmy Nardelo peppers.  I actually ended up picking a good number of the tomatoes and have put up 10 pints of juice, with probably five more pints worth of tomatoes in the freezer.  

Five pints of tomato juice from the San Marzano tomatoes.

And the little peppers that I thought were either hit by frost or burned by the wind?  They're absolutely loaded down with peppers now.  They're ok, but I probably won't grow them again.  I'll go back to my old favorite, California Wonder.

And while July was a bit better than last year (a tiny bit cooler on average with two or three little rains of about .25"), any hopes I had of a fall garden were pretty much over when the weather turned brutally hot again in August, and the rain effectively stopped.  


One of many HOT, dry days in August.

By the end of August, we were under a burn ban again, and now that September is here, almost all of the grass is dead.  The trees are shedding their leaves, I guess in a last ditch effort to survive, and the ground is like a brick.  And the few things I've tried to grow in the garden are being decimated by grasshoppers.  Even covering the plants with a shade cloth or netting hasn't helped much - the grasshoppers are either finding a way under the cover, or possibly eating their way through it.  So not a single cauliflower transplant survived, and I'm not sure the broccoli is going to make it either.  Every single beet I've set out or been able to sprout has been eaten down to the ground and my little fennel transplants didn't even last two days...gone, eaten by the grasshoppers.

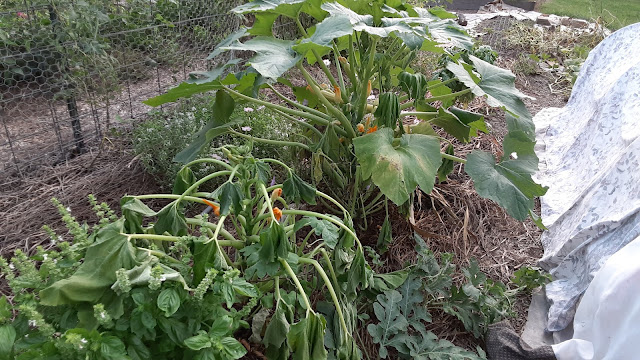
I don't think I've ever seen squash bugs as bad as they were this year either.  I don't know if I'll even be able to grow any squash, pumpkins, watermelons, cantaloupes or cucumbers next year because there are probably going to be so many of them hiding in the garden - in the straw, under the cardboard, in the raised bed around the cellar.  

Squash bugs of all ages congregated on a butternut squash.

It's very disheartening to have a beautiful squash plant loaded with little baby squash only to come out the next day to find it wilted beyond recovery.

Two hills of squash, killed by squash bugs just as they were old enough to start producing squash.  The one on the right was completely wilted by the next day.

Several times this summer I sat down to write a gardening journal entry, only to find myself staring at the computer and thinking, "What's the use?"  

There is really not much that's very "positive" to write about.  But as the 2023 gardening season is coming to a close, I thought it might be nice to look back on how some of my "projects" turned out, and to reflect on lessons learned and changes planned for next year.  

The bean tee-pees didn't work out too well.  Turns out the poles were two close together and not in the ground deep enough, so that tallest one ended up falling over anyway.  And because the beans were so thick, I couldn't see through the foliage very well so I don't know if I was not seeing the pods, or if they weren't making any because it was just too hot and dry.  Altogether, I think I picked enough that RAF and I each had about two tablespoons of beans for supper one night.  I might give the tee-pees another try next year, but I'll make sure the structure has a wider footprint, and I'll only plant one bean per pole.

The bean tee-pees.  The first one fell over not long after this picture was made.

Trying to grow things on both sides of the cattle panel trellis was a disaster.  The tomatoes planted on the south side of the panel where the green peas were planted were spindly and stunted until I finally cut the peas down.  The cucumbers on the north side of the panel opposite of the other tomatoes didn't grow well at all...they probably didn't get enough sunlight, and/or water.  So that's definitely something I won't be trying out again.

The Charles Dowding/Ruth Stout bed did really well in the spring, and I thought I had found the answer to gardening in the Arkansas summers.  I was excited by the potato harvest and was really looking forward to more potatoes from some that were planted later.  But once the drought hit, that area didn't live up to the hype either.  Little rain showers of 0.10" or 0.05" or even 0.25" just weren't enough.  The water wasn't able to make it through the hay into the ground and once that ground dried out, any thoughts I had of growing anything else there were done.  The only things that have survived are a few cherry tomato plants (they've turned into sprawling monsters), one poblano pepper plant (which I expect to be dead any day now) and the sweet potato vine, which is probably only surviving because it's growing in the shade on the south end of the bed.   I won't abandon that bed either, but I will need to put some thought into what I can do to improve the dirt.  I still think the deep mulch idea is a good one, but that area definitely needs more work.

The "smother the Bermuda grass" plan has been a modest success.  Early on in the year, I was pulling multiple rhizomes every time I made the rounds through the garden.  But the number of rhizomes has slowly gotten to be less and less and in the Charles Dowding/Ruth Stout bed, there's hardly any Bermuda grass growing now...only at the west edge where the bed meets up with the fence.  Edges are always going to be a problem I'm afraid, but this winter I think I'll pull everything back from the fence, dig out any rhizomes that I find, put down more cardboard and then pull the hay back over the new cardboard.  The other problem area - the edge where I put down privet chips last winter, is perhaps a bit worse, with more of the grass finding its way up through the cardboard and wood chips.  But all in all, that's made a big difference in the amount of Bermuda grass that's making its way into the garden, and while I know it's a war I'll have to fight as long as there's Bermuda grass in the yard, at least I feel like I'm winning a few small battles.

The Hügelkulture bed was lot of work...and I've decided that all of that work was for pretty much nothing.  Contrary to everything I read and watched on YouTube, that bed did NOT perform any better in the drought than the rest of the garden did.  I actually had to start watering it sooner than other parts of the garden.  I won't abandon it, but it is in need of some serious redesign.  I worked on it this weekend, flattening it out on top then planting it with a cover crop of lentils, a bag I bought at the grocery store that I never cooked.  I hope they'll come up and will fix some nitrogen in that really poor dirt.  (And at this point, it really is just "dirt," not "soil!")

Three "disaster areas" in the garden (from left): my row of Sorghum Sudan grass; my Hügelkulture row; and the Charles Dowding/Ruth Stout bed.  All three were a bust once the hot, dry weather arrived.

Like the Hügelkulture bed, my raised rows were a lot of work...work that I'm now regretting, and slowly undoing.  I realized during the first year of trying to grow things in those rows that I had made them too narrow, and the sides too steep.  Because of that mistake, they're much like the Hügelkulture row - it's almost impossible to water anything growing in them!  The water doesn't have a chance to soak in...it just rolls down the sides into the walking row.  So while I am doing my best to be "no-till" this is an instance of where I don't feel I have any choice but to undertake some serious "soil disturbance" to fix the mistake I made with those rows.  Little by little I've been using the pitchfork to loosen up the mound of soil at the top of each row, then drag it out to the side, essentially making flattened rows that are roughly 24" to 30" wide.  

A "re-worked" raised bed on the east end of the garden.  It has been flattened out into a lower, wider bed and I am able to water it now.

They're still slightly raised, but if I can ever find a source of wood chips, my plan is to fill in the walking rows up to, or almost up to, the height of the growing beds.  Already I'm seeing a huge improvement in my watering.  I'm now able to take my little green watering can and give the crimson clover cover crop I planted in one of the flattened rows a good soak.  It makes a huge difference and I wish I had known to do that when I started.  Just goes to show that you can't go by everything you read on the internet, huh.  But I guess to garden is to learn, and so I can put this in my "something I've learned" drawer.

And where I had started building raised rows on the west end of the garden, I've changed gears there too, and have instead switched to making more of the 24" to 30" wide beds, slightly raised, with walking rows that are around 16" wide.  I started on the part of the garden that was "occulated/solarized" under the billboard tarp, just because I didn't want it to start growing weeds once I moved the tarp.  I planted those pieces of row with a cover crop mix of daikon radish, hairy vetch and winter rye, but it's been a struggle to keep the plants alive.  It seems a shame to be using city water for cover crops, but I just don't think I could carry that much water that far as often as I would need to.  So for now, I am just giving the plants a drink in the evenings right around sunset, with the hope that we'll start to get rain again by the middle of September.

The wider, flatter raised rows at the west end of the garden and the flattened out Hügelkulture row on the far left.

This weekend, I finished those rows, using the shovel to relocate the dirt that I spent so much time building up into raised rows into the new flatter, wider beds.  Using the shovel reminded me of why I wanted to go "no-till."  I lost count of how many grubs I dug up as I was moving the dirt.  In the two that already had hairy vetch, rye and daikon radish I planted more of that same mix to finish them out.  But in the third one, I planted more Sorghum Sudan grass, then took what was left of the poor Sorghum Sudan grass I planted in the spring and laid it across the row to try to shade it just a bit.  I hope that it will come up and if I can keep it watered, maybe I'll have enough of it to use as straw to cover the strawberry bed for the winter (I never bought any straw at the feed store because it now costs almost $12/bale!)

And speaking of my strawberry bed, I'm pretty unhappy with it.  It hasn't ever really recovered after the rejuvenation process.  

The strawberries aren't looking so great.

It wasn't the rejuvenation process that was the problem.  I may have killed about half of the plants with the pine shavings I used for mulch.  What I discovered is that the pine shavings behave in much the same way that whole leaves do.  They mat together to make a barrier on top that the water can't get through.  So while I thought I was giving the plants plenty of water, in reality the water was probably just barely making it to the surface of the soil.  After I figured that out I spent about 30 minutes pulling the wood shavings off of the bed.  I need to find out when is the best time to lift the plants, and just redo the entire bed.  That makes me very sad.  

And while I'm worried about my strawberry bed, really, the entire raised bed around the cellar didn't look very good.  I might say it actually looked downright tacky.  

My raised bed, filled with, and surrounded by grass in the corner where the bumblebee nest was.

Recall that an American Bumblebee queen (Bombus pennsylvanicus) chose the raised bed for her nesting spot last spring, so to keep from disturbing the colony, I've pretty much steered clear of that area this summer.  I think the colony is winding down though, because I've seen three male bumblebees, found a few dead workers, and the activity going in and out of the nest area has slowed way down.  So I finally put on my gloves and pulled grass from in and around the raised bed.  It dawned on me while I was working on the cleanup that I shouldn't even try to find dirt to fill in the southeast corner of the bed...I will just use that as a place to put plants that I am taking out of the garden, sticks that fall in the yard, etc.  Eventually all of that material will rot down.  Yes, it will take a while, but in the meantime it will just be a work in progress - a "compost in place" operation.  And I am thinking I will build a cold frame somewhere on the south side of the raised bed.  Expect a post about that project if I decide to move forward with that!

All in all, I guess the fruit trees and berry bushes are doing Ok.  A few leaves on the apple trees have started turning yellow and dropping off, but I think that's just a normal response to the drought.  I've tried to keep them and the two little cherry trees watered as best I can.  I think they'll survive if I can just keep them alive until the rains return.  

Watering the little Enterprise apple tree.  I pulled the mulch back and slowly put three watering cans of water around the base of the tree.  The soil was then covered back over with grass clippings.

I'm not sure about the jostaberry plant.  It started to look quite pitiful once the weather turned so hot and dry, and it has finally lost every last leaf.  I think it's still alive, so maybe it has just shed its leaves in self-defense.  It might be one of those plants that really needs more shade.  I didn't bother to read that much about it before I planted it so might have made a mistake. I almost let one of the raspberry plants die from lack of water, but hopefully I realized it was in trouble in time!  The blackberry plants and the grape vine are, of course, suffering from the drought, but I hope they have root systems that are well-enough established that they're going to be Ok.

I am sad to admit that I was a bit too lax in maintaining the back part of the garden where the bean tee-pees were.  It got overgrown with cherry tomato plants (the one I pulled out today was sprawling about 8' along the ground), and because I didn't keep those plants under control, the grass came back and is trying to reclaim that area.  I used my string trimmer last month to clear out the purple hull pea cover crop in an area just the size of my billboard tarp, and have left that part tarped since then.  I'll need to do the same thing with the rest of it, but I don't know what will happen where all of the grass has gone to seed.  I guess I'll just be pulling grass every time I walk through there next year.  Sigh.  Farmer Jesse said to keep the soil covered because if you don't, it will cover itself.  Well, he is exactly right. 

Regarding my compost bays...I mentioned in a previous post about my mistake of letting things grow in and in front of them this year.  That was a big mistake, but I've also finally realized that one reason I've not had much success with my composting is that I haven't kept the materials wet enough.  I finally have a small, but nice little pile going in bay #1.  Little Joe made quick work of the corn stalks and that was a good addition to the pile.  It won't make nearly enough to cover beds in the garden, but I think it's going to make an excellent seed-starting medium to use in the spring.  If I can do that, and not have to buy a $20 bag of potting mix, that will be a win in my book.  And of course I plan to continue with my "manure and hay collection" this winter, Lord willing.


Wednesday, June 28, 2023

Tarps, shade and water

There are still some areas on the west end of the garden that are pretty unruly.  Really the best way I've found to fight the Bermuda grass and weeds is with black plastic and hot sunshine.

I had some black plastic drop cloth that I had bought at Meador's, and some heavier black plastic that was left over from when we built the shop many years ago (it was put down on the ground under the concrete slab to help keep the slab from sweating).

But the plastic I had wasn't able to stand up to the sun.  The heavier stuff from the shop actually broke down the worst, and when I tried picking it up to move it, it basically disintegrated in my hands. Not cool.  I ended up having to pick up lots of jibbles of plastic and although I tried my best, I know I still didn't get them all.

The stuff from Meador's has done better.  It rips when I try to move it if I'm not real careful, but at least doesn't fall apart.

So finally to the point.  Since my plastic was falling apart, I thought I might look into buying a used silage tarp.  But instead, I found a website that sells used billboard vinyl, billboardtarps.com.

A 10' x 16' size wasn't too terribly expensive and I figured that was probably as big of a tarp as I could handle on my own.  And although the shipping actually cost me as much (or maybe slightly more) than the tarp itself, I decided to go ahead and get one.

I told RAF that I hoped the tarp didn't have something offensive on it.  LOL

And it didn't.  It turned out to be a holiday tarp for some kind of wine.

My billboard tarp.

So although I hated to cover up some of the volunteer zinnias that were growing in the garden just east of the Sorghum Sudan grass row, I just tried not to think too much about it as I unfolded the tarp and pulled it up over the garden. 

My first impressions are very good.  It's very heavy, so I don't think it will hang on anything and rip.  Plus, it's reinforced around the edges, which makes it easy to drag and not worry about ripping the edge. 

The vinyl is UV protected, so it should last a long time.

The only real objection I have was the smell.  When I unfolded it and dragged it out into the garden, there was a very strong smell of vinyl that I could smell all the way at the other end of the garden.  I think any time you smell plastic, that's probably not a good thing, but the smell was pretty much gone after a couple of days.

The tarp on the garden.

The tarp is heavy enough that unlike the plastic, I don't know that it would even blow around if I didn't weigh it down, but just to be sure, I put some t-posts down around the edges in a few places.

And looking at the weather forecast, I'd say I got the tarp put out just in time.  It's certainly going to have plenty of sunshine that will absolutely bake anything that's under it.


Unfortunately, that also means that the plants in the yard and garden are going to be baking in the sun too.

I had already started working on protecting things through the intense heat of summer, starting with the strawberry bed.  Since the insect netting was no longer needed on the brassica bed (the cabbages have been harvested and the broccoli was a bust) I was able to move those over to the strawberry bed to hold up the shade cloth I bought last summer.

Shade cloth protecting the strawberry bed.

These plastic hoops made from PEX pipe work so much better than the pieces of welded fence wire I tried to use last summer!  No matter how careful I tried to be, the shade cloth would always hang on the cut edges of the wire, and I was so afraid I was going to rip it!  But these hoops are smooth and all I had to do to fasten the shade cloth to them was use some bread ties to secure the cloth onto the hoops.

My main problem though, isn't the hoops.  My main problem is that I only have the one piece of shade cloth.

So again this year I'm using some old bed sheets to try to protect the plants from the intense sun.

I had a little cantaloupe plant that came up volunteer in last year's compost that already has two little melons on it - I definitely didn't want it to die in the heat!  So I took the last two PEX hoops and rigged up a little frame to hold a sheet over that.


Shading the cantaloupe.

I thought I could use some of the electrical conduit I had bought to use in the shop to rig up a frame to hold some sheets over the tomatoes, but that idea absolutely did not work.  The end of the conduit with the bell on it was just too stiff to bend at a good angle.

So instead, I'm hoping that the application of Kaolin clay that I've put on the tomatoes and the cucumbers in an attempt to protect them from stink bugs and cucumber beetles will help.

Kaolin clay sprayed on the cucumbers and tomatoes.

According to the information online about kaolin clay, it can cool plants by 10° to 15° F. I've not checked on the plants this afternoon to see how they look.

I also am trying to protect the green beans, because they still have a few small beans on them.

Sheet covering the green beans.

(I need to do a bit of work on this..the hoops are too far apart to really hold the sheet up, and with only two of them I can't cover all of the plants.)

It's a bit sad really that the heat has made it here just as the corn is starting to tassel.  I don't know if it will make anything or not, and I really don't have a good way to protect it from the sun.

But based on what I learned last year, shade is the key to getting the plants through this hot part of summer.  Even when I was watering things every day, the water wasn't enough to offset the baking sun for hour after hour after hour.  And since the temperature isn't going to get down low enough at night to cool things back off, the effect is cumulative.  The plants just eventually give up.

Long term I'd like to put up a frame of some sort that can hold a big shade cloth, but as RAF pointed out, we have other much more important things we need to spend money on before I do that.  So for now, I'll just have to work with the sheets to see if they can make a difference.

Maybe we'll get lucky and the heat and dry weather won't last as long this summer.  But it's going to be brutal while it's here. 


The four 55 gallon rain barrels are full (220 gallons), one IBC tote is full (250 gallons) and the second IBC tote is half full (125 gallons).  

IBC tank about half full.

That's not nearly enough water to last through July, but it's a start.  Since I'm paid well ahead on my water bill, I've already been watering stuff with the garden hose.

I hope this heat doesn't last too long.  I think we might get a break by 4th of July, but with any cooler weather comes that risk of severe storms.  We just have to take what comes I guess.


Saturday, June 24, 2023

I'll never grow potatoes any other way

This spring I decided to try a section of garden inspired by Charles Dowding's "No Dig" method and Ruth Stout's deep mulch method (March 14, 2023 Gardening Journal).

I had some potatoes from the grocery store that were starting to sprout so those seemed like good potatoes to use for this little experiment.  My sister later gave me some of her left over seed potatoes so I have ended up with probably a dozen plants altogether.

As the potatoes grew I hilled them up with hay/cow manure I had collected from the field.

Today, I decided to go ahead and pull a couple of those first ones (the ones from the grocery store potatoes).  The plants had pretty much died back and weren't going to grow anymore anyway.

The plants were very easy to pull out and as I started to rummage through the hay, I was delighted when I started finding potatoes! 

While some were quite small - perfect for boiling in their jackets - there were a few nice sized ones as well.

There were a couple of little snakes living down in the hay, and a huge fat earthworm.  The hay was pretty dry, but I think there was still moisture in the ground under it.  I didn't dig down into the dirt to find out for sure though.

And because the potatoes were all up on top of the ground or in the hay, they were very clean...no dirt to wash off.  Plus, not a single potato was damaged by a shovel or fork in the process of "digging" them.


I think had we gotten more rain this spring the potatoes would have been much larger, but even so, I'm 100% sold on this method of growing potatoes.  I will never plant potatoes in the ground again!  Growing them using this method is so much easier!!!

3.428 lbs of potatoes from the garden (I forgot to weigh them before we ate some last night).


Friday, June 23, 2023

Training the apple trees

The apple trees are now in their second year - they were planted sometime in March 2022.

In January, I pruned the Enterprise apple to a modified central leader, and tried to prune the Gala apple to an open center.  

From what I understand, apple trees produce flower buds on more horizontal limbs.  When the limbs go "up" the trees don't make flower buds...they just make leaves.

Since almost all of the limbs on the Enterprise apple, and some on the Gala were angled in a more "up" direction, I decided to try training them out horizontally using some pieces of privet branches that I wedged between those limbs and the main trunk. 

Using some pieces of privet limbs as branch spreaders.

Sadly, when I was trying spread the branches on the Gala apple, I accidentally broke one off, so I ended up pruning it to a modified central leader as well.  After the second pruning, I thought it looked Ok, although it had a big open wound on the main trunk where I ripped that branch off.

Ouch!!!!

Over the next few weeks, the branches adjusted to their new position.  The privet sticks ended up falling out, but the branches stayed where I had put them so that training seems to have worked. 

The trees have grown like crazy since they were pruned...some of the limbs have about 24" of new growth on them! But just like last year, the growth went "up" instead of out.  

So this afternoon when I got off work I spent a bit of time working on the Enterprise apple.


The poor little tree kind of makes me think of the pictures of Gulliver tied to the ground in the island country of Lilliput!

But I'm happy that the branches all seem to be in a better position now.  It will stay like this for the rest of the summer.  I hope that there aren't any bad winds that might break the limbs, since they can't really move much.  

The Gala apple was much better behaved with fewer upward growing branches.  I'll work on getting those limbs tied down this weekend.

I told RAF he'll just have to make a wide path around the trees when he mows.  Hopefully by the time fall gets here the strings can all come off and the limbs will stay where I want them. 

And even more hopefully, maybe there will be some fruiting buds on them by next spring!  I may end up doing some "tip" pruning to encourage them to develop fruiting buds, but I'll have to wait and see if I feel brave enough to do that.